The open source software movement has come a long way and I’m particularly excited by the improvements made in automated code QA and how it empowers a small team (sometimes, a team of one) to develop software that, just a few years ago, required a large group of programmers and testers and long development times mostly comprising of manual code reviews.
How does automated code QA make this happen, you ask? Let me explain by walking you through my local development setup of my latest two open source projects, the ManaMana Framework, and RedStack.
DISCLAIMER: These two projects are still in alpha/beta stage. Still, that shouldn’t stop us from appreciating the power of automated software QA.
Test First Before Code
I am a believer of the TDD and BDD movement so when I develop, I make sure to write the test first before I write code. As a high-level overview, here’s how my tests and code are organized for RedStack.
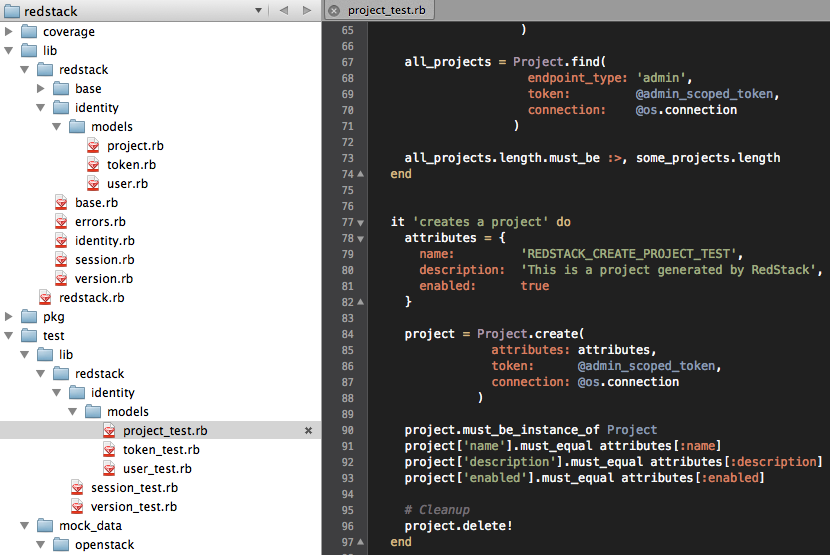
RedStack’s main code resides under /lib whereas the tests for it reside under /test/lib. The file
view on the right side is showing a section of project_test.rb which contains all the tests for
project.rb. I use MiniTest for my unit
and integration tests, specifically minitest/spec, because of its simplicity and ease of use.
So a quick walkthrough of how I implement the features for RedStack would be:
- Write a test such as the
it 'creates a project' do...endblock that you see above, pretending that the method being tested already exists. In the above example, the first half of thecreates a projecttest is where I call the method (project = Project.create(...) and the second half is where I check its output. - Save the test and run it. I’ll show below how this is automatically done everytime I save a file.
- I write code in
project.rbto satisfy the test. - Run the test
- Repeat until test is satisfied
Oftentimes, more than one test is needed to ensure that the method I’m writing is bug free. In that case, I still follow the same test-first-before-code process.
The beauty about this methodology is that writing a test is like adding a teammate to your project whose job is to repeatedly go through your code as many times as you need him to and tell you immediately if it’s broken or not.
Continuous Testing
So far, though, your ‘teammate’ is not very proactive: it will only check your code if you remember to run it and, sometimes, when you are so engrossed with coding, it’s very easy to forget this. When that happens, minutes have passed and when you run your tests again, you might find a lot of broken code that’s hard to debug. This leads you to ignore your tests ‘for now’ which will eventually lead you to ignore it altogether. Before you know it, your tests are useless.
This is where I put continuous testing to good use. For this, I use Guard to monitor file modifications in my project and to automatically execute one or more tests depending on what changed. Here’s what I get when I write code and all tests are satisfied:
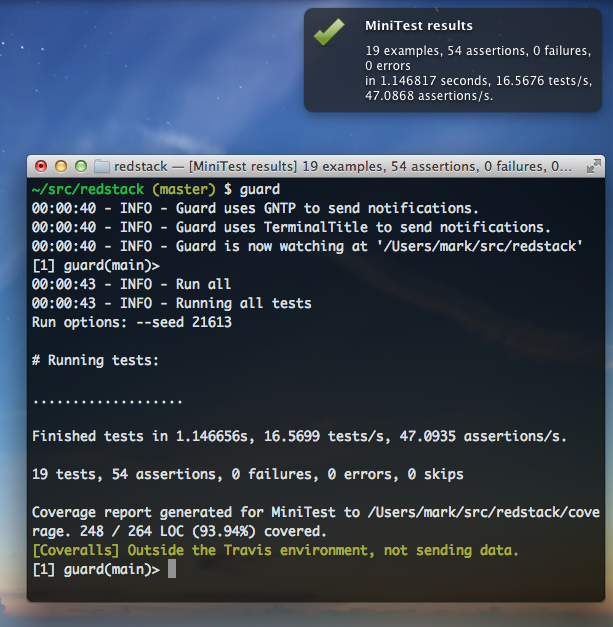
There are a few things happening in the above screenshot. Let me highlight the important ones:
- Guard is running from a terminal and it’s configured to run one or more of my tests depending on what has changed in my project.
- At 00:00:43, I pressed Enter which is a signal for Guard to run all of my tests
- Each dot in that line of dots on the terminal represents a test
- The rest of the text below the dots show test results and statistics as reported by MiniTest
- Guard sends the MiniTest output to Growl which shows me a nice popup on the top right of my desktop telling me all of my tests pass.
That’s all cool, but so far we haven’t seen how Guard automatically runs my tests. For that, I changed my code to deliberately fail. Guard detected the file change and automatically ran the related tests. Here’s what happened afterwards:
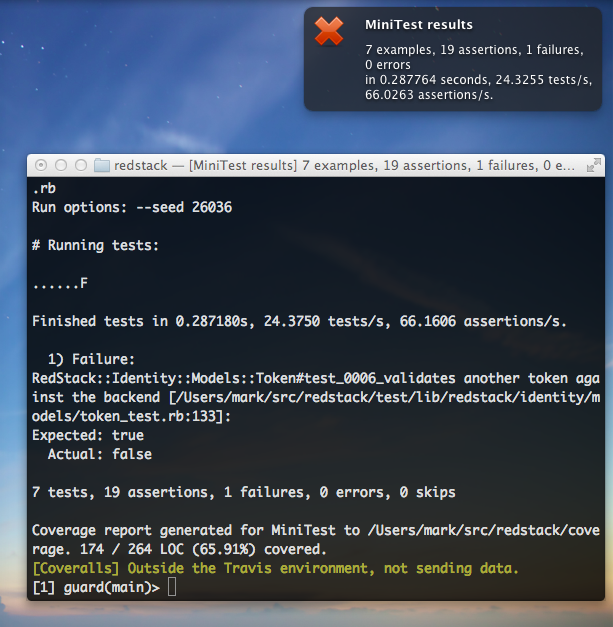
- Guard saw that I modified a certain file and executed only the tests related to that file. Notice how there are less dots in the above screenshot compared to the previous one.
- MiniTest detected that one of my tests failed and reported this failure along with useful supporting information that will help me debug this error pretty quickly.
- Guard, again, sends the MiniTest output to Growl so I will be aware of this error even if the terminal is covered by my editor as is often the case.
And that’s how to ensure that your tests stay fresh and relevant.
Monitoring Code Coverage
So far, we have tests and we have a way to ensure that they stay useful. However, just because all tests pass doesn’t mean that your code is bug free. How is that possible, you ask? Well, it may be the case where your test suite isn’t testing most of your code. This is where code coverage comes into play. With code coverage, you can see which parts of your code was exercised by your test.
For this, I use SimpleCov which you saw in action in the above screenshots but probably didn’t notice it. Did you wonder about the line that says “Coverage report generated for…?” Let’s look at a sample coverage report generated by SimpleCov:
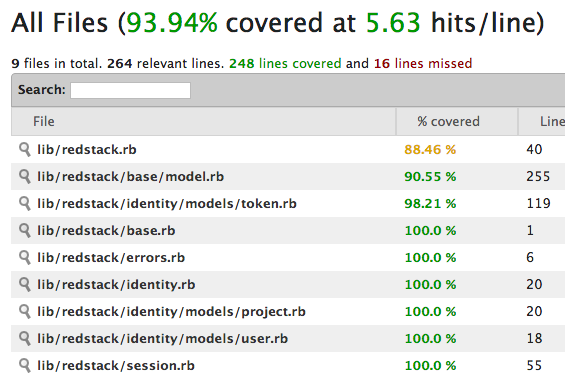
The above summary tells me that about 94% of my code is being exercised by my tests. Cool. Clicking on one of the items in that list will show me the exact lines in my code that are being exercised or not:
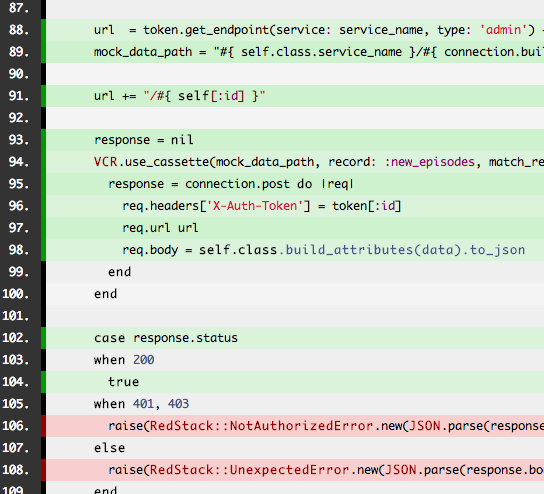
In the above screenshot, lines that are green were exercised by my tests whereas lines that are red were not. Red lines can tell me one of two things: 1) I need to test that code, or 2) That code is probably not necessary and I should delete it. Whichever it is depends on the situation.
Don’t Get Complacent With Code Coverage
Just because your code has a high code coverage doesn’t guarantee that your code is bug free. Here’s a real-world example that I didn’t notice was a bug until much later. It was not detected by my tests and SimplCov marked it (correctly) as covered.

What’s wrong with that line of code? That error message is in the User class, not the Project class, so it should say “…not authorized to delete user.” It’s a bug, but because I was not specifically testing the message and because SimpleCov was marking it green, I didn’t notice it until much later.
Summary
Automated code QA has made some great strides these past few years thanks to the many contributions of some of the great minds in the open source community. The above walkthough doesn’t do justice to the tools mentioned so here are some bonus items:
- Guard isn’t just about automatically running tests. For example, in the ManaMana Framework, I use Guard to automatically build my DSL compilers whenever I change something in their grammar files.
- My local dev set up is good for continuous testing, but a good continuous integration server is still very important to ensure that the software builds properly in a fresh environment. For that, I use Travis CI.
- I use SimpleCov to quickly see my code coverage locally, but I also like to publish that information without needing to check in the coverage report with my code. For that, I use Coveralls .
- Static code analysis is becoming in vogue these days. For that I am currently experimenting with Cane and Code Climate.
I’ve been saying this for some time now: It’s a good time to be a programmer, thanks to the tools that are available to anyone for free these days.